Available in v6 patch 4
I have recently restructured the patient portals document and templates feature for better template management and much better responsiveness on mobile. The entire portal was restructured with an eye on being small device friendly. The Portal no longer has any sidebar menus where now all activities are selected from the top navbar. Patient My Documents has been reworked to provide the maximum viewport possible on mobile. All of the IOS browser issues noted by others and myself have been solved as well.
iPhone 12 Pro and an LBF template.
The following will describe the setup and management of the templates that will eventually be rendered in the patient portal. I will be editing and adding more content here over the next week in hopes of trying to help make sense of how the portal works for users sake.
Fully Expanded view:
In General
Templates can be organized by Categories and/or Profiles which may be used to group templates of similar content type such as Registration forms or Intake etc.
The usefulness of categories is mainly where the category will become a subtitle in the Document menu of the portal making clear the document type to the patient.
Categories are not required and may be omitted from use.
- To create or change category names, navigate to the list at Administration->Forms->Lists ‘Document Template Categories’.
Profiles are typically used to group a set of templates that can be scheduled and assigned to patients as a set. A profile can be assigned any template from the template repository and a template can be assigned to more than one profile.
- For Profile name assignments navigate to the list at Administration->Forms->Lists ‘Document Template Profiles’.
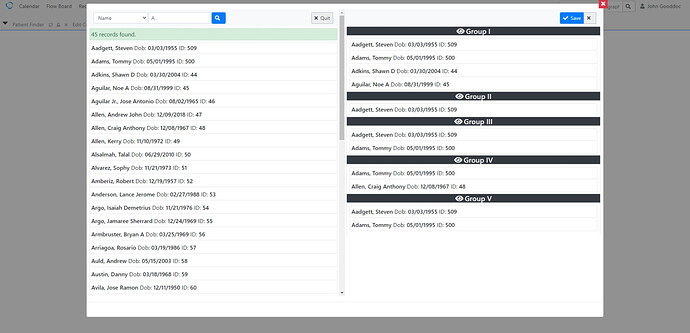
Another useful feature is Patient groups by category. For example, a user could create a patient group named Chronic Pain and assign all appropriate chronic pain patients to the group. You may have as many groups as needed to describe your patient population. Note also that patients may be assigned to more than one group.
Patients may be assigned to a group(s) by patient categories in one of two ways. First is from Demographic Choices Patient Categories field or using the drag and drop dialog in Portal Dashboard Template Maintenance Groups button. Group usage regarding templates will become more apparent later.
Assign to Groups Fake PHI
- Patient group naming can be setup and managed at Administration->Forms->Lists ‘Patient Groupings’.
Portal Dashboard Template Maintenance.
There are three main views in Template Maintenance. The first is the ‘Template Repository’ where you store all templates for future edits and assignments. All patient assignments must come from the repository where in previous versions, user could upload directly to the patient. Second is the ‘Default Patient Templates’ which shows all current templates that are default and appear in all patient portals. Lastly is ‘Patient Assigned Templates’ that show templates currently assigned to the individual patient.
Template Uploads
To upload local text or html templates click the Upload button in Template Repository title to expose the file select button. Next select a Category from Scope bar if wanted then click files select button to show the file browser. You may select as many files to upload within reason Eventually file name becomes a Pending document selection in Portal Documents.
For example: Privacy_Agreement.txt becomes Privacy Agreement button in Patient Documents.
Templates are automatically uploaded to the Template Repository. All actions on template disposal such as sending templates based on what locations are selected from the Scope bar or selecting Profiles to activate in portal, will be carried out here.
Navigation
The top navigation action toolbar named Scope is global to the entire form. It consists of Location, Category and several action buttons. The clear button to clear Location multi selections, Send button to send templates to patient(s) or profiles to Location and Category current selections or the search/refresh icons that will select patient(s) or the Location scope in all views. By selecting location and or category, all the table views in the form will reflect this selection.
Best practice is to select Location(s) then a Category if applicable for the location then click the appropriate action button.
Additionally, to the right is a toggle to select if you want to use the pop out window or dialog template editor. The window allows having multiple editors open where the dialog is more appropriate for making quick edits.
The remaining three button in the Scope toolbar are drag and drop enabled:
-
‘Profiles’ is where templates are assigned to a profile and whether the profile is recurring after a given time frame in days. Recurring profiles will show the document to the patient again once the timeframe has expired. The time counter starts when patient submits a document for review.
-
‘Groups’ is a dialog that allows quick assignment of patient(s) to selected groups that were set up in Lists.
-
‘Assign’ dialog allows assigning patient groups to profiles. Once a group is assigned to a profile and the profile is activated from the Repository view, all patients in group(s) will automatically receive all templates assigned to the profile. The same group may be assigned to one or more profiles.
Profiles are activated in Repository and once activated, profile template set becomes available in assigned group patients portal immediately. Even if templates are added or removed from profile or patients are added/removed from a group, it is reflected in patients portal.
More later…


