Updated 02/20/22
For all those that will be installing v6.0.0(4) patch that also use the patient portal, there have been some major changes to managing patient forms and documents from the Portal Dashboard.
The portal has also undergone a major restyle for better patient experience on small devices.
A clarification. I have been calling the forms created for eventual documents once patient submits in portal, templates. This is confusing to some so consider template building as a form builder.
Patch
02/20/22 Removed pre patch due to upcoming release of patch 4. The following instructions will apply to patch 4 the same.
Be sure to run sql_patch.php after install.
Please read this thread for background for additional info on setting up necessary Lists and capabilities:
- Newly revamped Patient Portal v6.0.4 and future v6.1.0
- Also available is a quick overview video create during a recent video conference.
https://www.youtube.com/watch?v=UnYBr0wlAZk
Install patch.
- Backup your openemr directory.
- Unzip patch inside of openemr directory.
- Run sql_patch.php from browser.
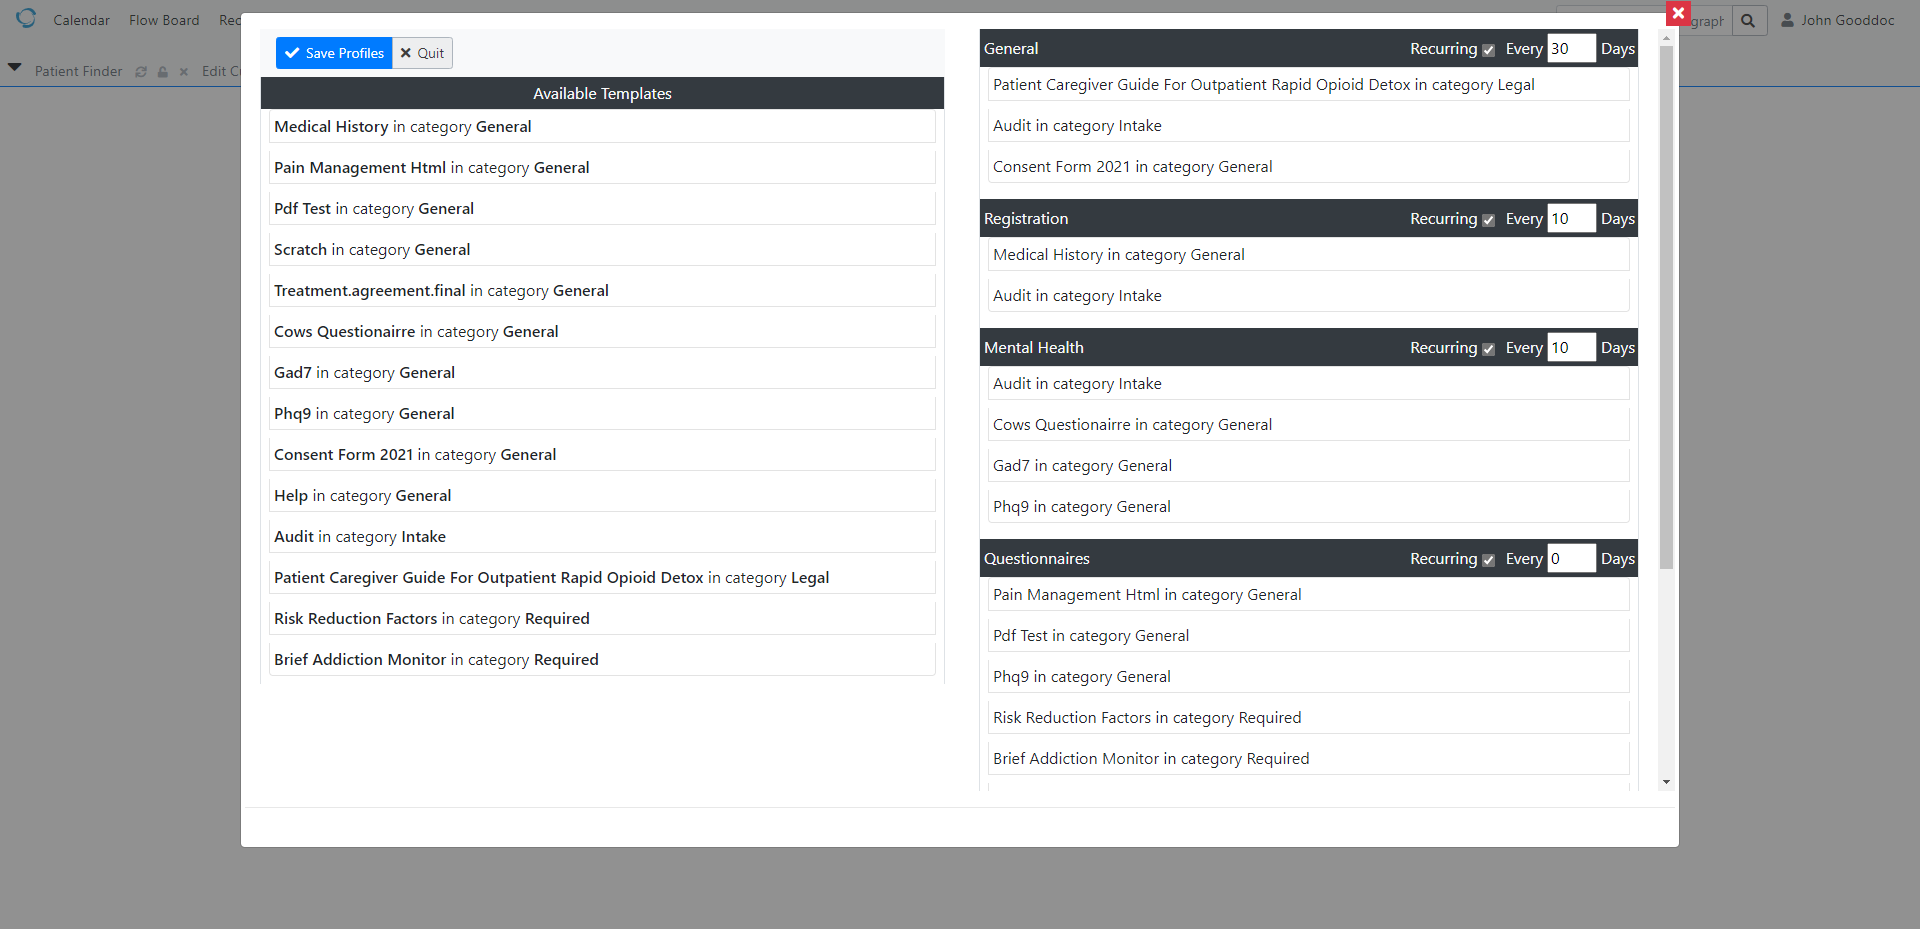
- Set up your Groups, Profiles and Categories in Lists.
Setting up Groups, Profiles, and Categories are done in Lists. the following are the list titles:
- “Patient Groupings”
- “Document Template Profiles”
- “Document Template Categories”
All the lists have defaults that are general assuming user will change list titles to be more appropriate to user application of portal templates.
Import existing templates.
Once above is done you will need to import all your existing templates from the current file system at:
sites/default/documents/onsite_portal_documents/templates. If you’ve templates assigned directly to patients then also upload as well.
These will install to the Template Repository so you can then assign to Profiles or patient Location and/or categories.
The patch includes the normal default templates that shipped with previous versions of portal. They are assigned to both Repository and Default Patient Templates.
- A quick note about Default Patient Templates. Since any template assigned here always appear in all patient portals, they will not appear in the Patient Assigned Templates view. I recommend to not use this feature(Default Patient Templates) and delete all forms, except Help, from Default Patient Templates and assign as normal templates in Profiles. Though there are many that may only need the same templates for all patients, by all means keep and add additional templates from repository. This is the reason I left this legacy feature intact.
Assign Templates.
Time to setup for template assignments. To remove item from any drag and drop dialog simply drag the item from the right panel into the left panel.
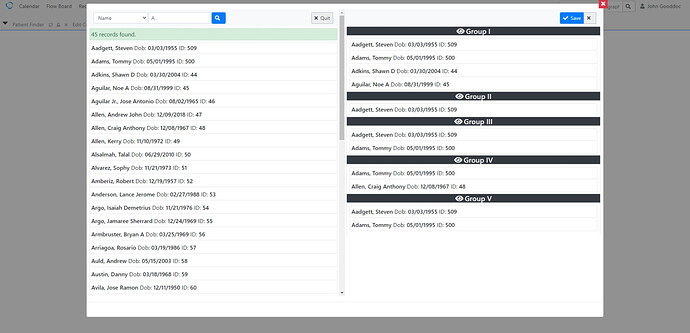
Patient Groups

- Drag and drop patients from left panel to appropriate group in right panel. I highly recommend using this feature because assigning templates to each patient from the location in Scope toolbar will be tedious to say the least. Plus once setup, all that is necessary to assign templates to new patients is to add patient to group on intake or registration.
- Again drag and drop the assignment. For Profile scheduling, Recurring is recommended if the template set is needed to be forms the patient needs to address more than once. If Recurring is not selected then once the patient has finished the form, it will never reappear unless sent directly.
Categories
You may assign templates to categories for further help with organizing. This is done in the Repository using the category pulldown. The effect of categories in portal is that all categories become titles in Document menu.
- The red menu items means the patient has saved a document to their history and still needs to finish.
Finishing up
Once ready go to the Repository view and scroll to
To send or activate Profiles in portals. Note:
- You activate Profiles that have Groups and Send profiles to Location if a profile is not assigned a Group.
- Check the checkbox for the Profiles to activate. A button will appear anytime a change is made to a Profile checkbox .
Click Update and now the profiles are active in portal. - For profiles that haven’t any Groups then the profile may be sent to one or more patients by selecting the patient(s) from the Location toolbar searchable multiselect. A Send button will appear in toolbar for sending to the Locations.
This action has no affect on the Profiles with Groups and I probably need to hide as I do otherwise.
Patient Assigned Templates
You must select what you want to view from Location. You may select one patient, a group of patients or All Patients the click the search button. The view will show what templates are currently assigned and some status information. The only templates that may be deleted in this view are those specifically sent to the patient.
Some other neat stuff
A couple new template directives namely
{SignaturesRequired}when added to a template with patient signature directive will force patient to sign their document before being allowed to submit document to review.{AcknowledgePdf:id or name:prompt}for example:
Upload a pdf to repository where it will be assigned an id and template name.
Then create and upload a template similar to:
{ParseAsHTML} {SignaturesRequired}
{AcknowledgePdf:80:Click to view and acknowledge}
Please sign here to acknowledge you have read and understand content: {PatientSignature}
Resulting in a rendered portal document:
and
Of course this is example pdf and currently fillable pdf is not supported however, soon will be.
I’ll soon be doing more documentation on template directives and template design. Until then this should keep you busy.![]()
Anyone that wants to contribute to documenting portal it’d be a great help!


