Zhilling - I was also exploring FHIR APIs and took a while for me understand the integration architecture. I was able to finally understand how JWT works with respect to FHIR servers. Here is some information which might help you to get started:
Client Credentials Grant using JWT for making FHIE API Calls
Client credentials flow is typically used in machine-to-machine (M2M) applications, where the user’s interaction is not suitable or required for authenticating the services. Examples of machine-to-machine applications are CLI scripts, daemons, or backend services. For such applications, the usual authentication mechanisms such as user/password or social logins are not suitable, instead these applications will use Client Credential Flow to authenticate themselves with Client Id and Secret to get a token and use that token to access the resource.
Here are the typical steps in Client Credentials Flow:
- Register an app in the application server. When the app is registered, the application server will provide client Id and client secret. This is a one time activity.
- Obtain a token from the server using client id and client secret
- Access the resource from the server using the token
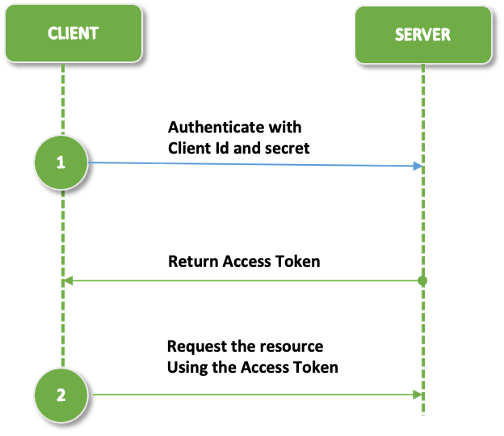
As depicted in the above diagram, client credentials authentication type uses client id and secret while requesting a token from the server.
However when it comes to authentication with FHIR servers like OpenEMR, it doesn’t require client id and secret, but a JWT assertion with client id and other information as explained below.
There is a lot of information about JWT on the web. But it is very confusing for many people to understand the concept and relate that to how FHIR servers use JWTs for authentication.
I will try to explain the concept behind JWT with respect to FHIR server and the process of generating JWT assertions to use in API calls to request a token. There is also a good amount of information on HL7 website: https://hl7.org/fhir/uv/bulkdata/authorization/index
JWT stands for Json Web Token which is a very modern and secure approach used for authenticating the client with the servers. JWT provides a stateless mechanism to share the information without storing session information in cookies which makes it suitable for REST APIs such as FHIR APIs.
Following diagram depicts client credential authentication flow using JWT:
Above steps are explained in detail below:
Step 1: Obtain JWKS (Jason Web Key Set)
JWKS stands for Json Web Key Set which consists of a set of public keys which can be used for verifying Java Web Token (JWT) by the authorization server and signed by RS384 signing algorithm. It is important to note that public key should be provided to the authorization server at the time of registration. This can be done in two ways: provide the public key itself or provide the URL where public can be found.
In our example below, we will use former approach where we will provide the public key at the time of registration.
The easiest way to generate JWK is using the web based application provided by https://mkjwk.org. This website provides an easier way to create JWK.
• Use the following parameters for creating JWK:
• Key Size: 2048
• Key Use: Signature
• Algorithm: RS384:RSA
• Key ID: SHA-256
• Show X.509 : Yes
When you click on Generate button, it will show public and private key set as below. It will show X 5.09 certificate as well just below the key sets.
Copy this information and keep it safely as this will be needed in next steps.
TIP: Note that mkjwk.org claims that they don’t store any of this information on their server. It is safe to use the keys generated by their app, however for added security and confirmation they also provide libraries which can be downloaded locally to generate the keys from your local server.
Step 2: Register the client in Open EMR
After the JWK keys are generated, next step is to register the client in OpenEMR. This is required and stipulated by HL7 guidelines so that the client is preauthorized before requesting a token,
While register the client, following parameters need to be sent in the request:
• Application_type
• redirect URIs
• post_logout_redirect_uris
• Initiate_login_url
• token_endpoint_method
• contacts
• scope
• jwk
Here is as an example of a sample registration request:
  {
   "application_type": "private",
   "redirect_uris": ["https://localhost:8080/redirect"],
   "post_logout_redirect_uris": ["https://localhost:8080/logout"],
   "client_name": "New JWT App 13",
   "initiate_login_url": "https://localhost:8081/launch",
   "token_endpoint_auth_method": "client_secret_post",
   "contacts": [ "me@example.org","them@example.org"],
   "scope": "openid offline_access api:oemr api:fhir api:port patient/Patient.read  patient/Procedure.read   system/Patient.read system/AllergyIntolerance.read system/CarePlan.read system/CareTeam.read system/Condition.read system/Coverage.read system/Device.read system/DiagnosticReport.read system/Document.read system/DocumentReference.read system/Encounter.read system/Goal.read system/Group.read system/Immunization.read system/Location.read system/Medication.read system/MedicationRequest.read system/Observation.read system/Organization.read system/Person.read system/Practitioner.read system/PractitionerRole.read system/Procedure.read system/Provenance.read",
  "jwks": {
    "keys": [{{"kty":"RSA","e":"AQAB","kid":"5c17409c-87f0-4713-814f-c864bfe876bc",
.......
      }
    ]
  }
Tip: Make sure system scope is enabled in Open EMR in Global Settings, otherwise client registration will throw error if you are using system scope.
The registration API will return the client Id and client secret, but we are interested only in client Id. We need this for creating a JWT assertion in next step.
Step 3: Create JWT client assertion
JWT stands for Json Web Token which is a modern and secure way to share client session information in a stateless manner, The easiest way to create a JWT assertion manually by going to jwt.io and entering client id, and other information as mentioned below.
JWT has three parts – header, payload and signature.
Header requires following parameters:
| Parameter |
Description |
| alg |
Algorithm used for signing the authentication JWT e.g RS384, ES384 |
| Kid |
The identifier of the key-pair used to sign this JWT. This identifier should be unique within the client’s JWK Set. |
| Type |
Fixed Value: JWT |
| Jku |
Optional - The TLS-protected URL to the JWK Set containing the public key(s) accessible without authentication or authorization. When present, this should match a value that the client supplied to the FHIR server at client registration time. |
Payload requires following parameters:
| Parameter |
Description |
| iss |
Issuer of the JWT – the client’s client_id, as determined during registration with the FHIR authorization server |
| sub |
The service’s client_id, as determined during registration with the FHIR authorization server (note that this is the same as the value for the iss claim) |
| aud |
The FHIR authorization server’s “token URL” (the same URL to which this authentication JWT will be posted) Example: https://xxyx.xx/oauth2/default/token |
| jti |
A string value that uniquely identifies this authentication JWT. |
To get JWT, go to https://jwt.io and enter header and payload information as explained above. For signature, use the public and private key which were obtained in Step 1 while creating JWK.
The UI in jwt.io looks as below:
Tip: Signature Verified check will appear only if the signature key is valid. If you see Invalid Signature, ensure that public and private keys are correct.
Tip: This step can be automated programmatically in Java, Python or any other languages. Jwt.io provides a means for quickly creating the JWT assertion for PoC or testing purpose, but it is recommended to automate this process in your application.
Step 4: Request a token using JWT assertion
In this step, you will use the JWT assertion created in the previous step. As mentioned earlier, token is needed for making a FHIR API call.
To get a token, make a HTTP POST request to token endpoint URL using content type application/x-www-form-urlencoded with following parameters:
| Parameter |
Description |
| scope |
It should match the scope which was provided during client registration process. Example: openid offline_access api:oemr api:fhir api:port patient/Patient.read patient/Procedure.read system/Patient.read system/AllergyIntolerance.read system/CarePlan.read system/CareTeam.read system/Condition.read system/Coverage.read system/Device.read system/DiagnosticReport.read system/Document.read system/DocumentReference.read system/Encounter.read system/Goal.read system/Group.read system/Immunization.read system/Location.read system/Medication.read system/MedicationRequest.read system/Observation.read system/Organization.read system/Person.read system/Practitioner.read system/PractitionerRole.read system/Procedure.read system/Provenance.read", |
| grant_type |
Fixed value: client_credentials |
| client_assertion_type |
Fixed value: urn:ietf:params:oauth:client-assertion-type:jwt-bearer |
| client_assertion |
Signed authentication JWT value (from step 3) |
Postman Request:
Use the access_token returned by the response in the next step to make a FHIR API call
Step 5 Issue FHIR API Call
We are almost at the end. We have a new access token. This needs to be sent in FHIR API call with Authorization header of Bearer token.
If everything goes well, you will be able to see the response from the FHIR server as shown above.


